 Purlbed
Socks · Easy
Baby socks
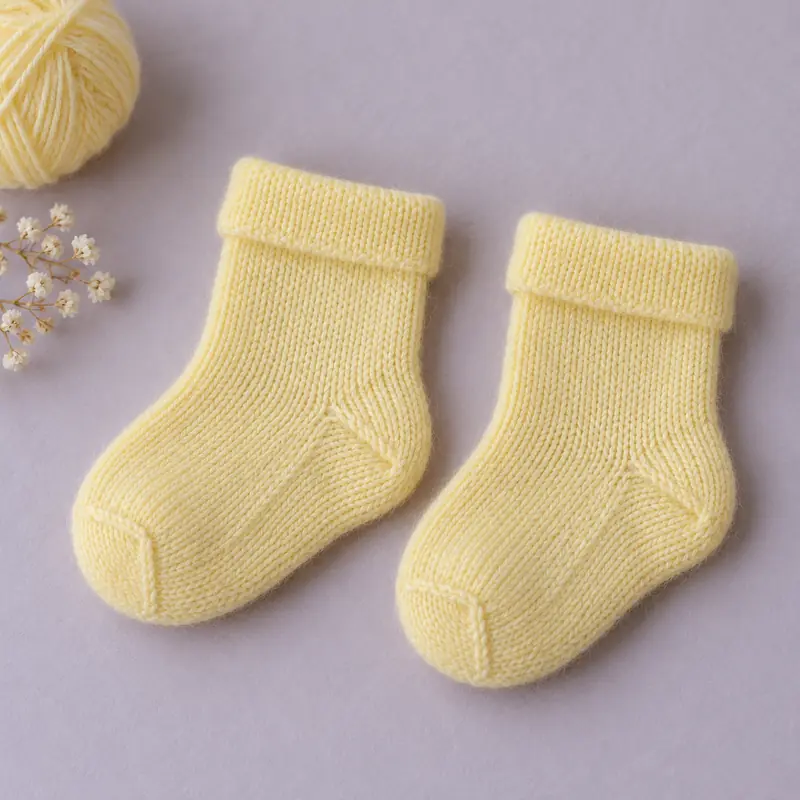
Built like the everyday socks, just very small: the whole sock is a strip a few centimetres wide. The short-row heel gives the sock a real heel cup, and that is what keeps it on a kicking foot. A pair takes an evening. You need a machine whose needles can wait in hold; a hand flat cannot do it.
Which knitting machine do you have?
Not sure? Look for the model name on the carriage or the box and compare it with the examples.
Only machines that can knit this pattern are listed.
Which size?
How big are your stitches?
Start with your machine's needle spacing. For an exact fit, knit a small swatch and type in what you measure.
My own gauge (from a swatch)
How do I measure my gauge?
- Cast on 40 needles with waste yarn and knit a few rows. Change to the main yarn and choose a tension that gives a fabric you like (see the starting points below).
- Knit 60 rows. Tie a contrast thread to the 11th needle from each side at row 10 and row 50, so the marks are 20 needles and 40 rows apart.
- Knit a few rows of waste yarn and take the swatch off. Steam or wash it the way you will treat the finished piece, and let it rest flat for a few hours.
- Measure between the marks: stitches in 10 cm = 20 ÷ width in cm × 10, rows in 10 cm = 40 ÷ height in cm × 10. Type the two numbers into the gauge boxes above; that tension is your main tension (MT).
Add a little pattern? (you can skip this)
Pick a symbol, type a few letters, upload a picture or draw it stitch by stitch. Where your machine can, it knits the pattern from a punch card; otherwise you knit the piece plain and embroider the pattern on afterwards.
Before you start
- Yarn: Soft, washable sock yarn or superwash merino (4-ply / fingering) on a standard 4.5 mm machine. Avoid fluffy yarns: babies put their feet in their mouths. About 15 g in total for this size (an estimate from the area of the pieces; buy a little more).
- Also: Tapestry needle, Waste yarn (single bed), Hold levers or buttons set on the carriage
- Baby 0–6 months · Single bed, punch card · Gauge (stocking stitch, after steaming): 30 sts × 40 rows
✓ Checked by the virtual test knit
Start knitting
All steps, charts, sizes and checks (for printing)
Virtual test knit
✓ Virtual test knit passedEvery row of every piece on this page has just been knitted on a model of your machine, for the size, machine and gauge you chose. The model follows each needle's loops through transfers, held needles, hems and cast-offs, then measures the finished pieces.
286 rows and 4,176 stitches knitted, 0 stitches transferred, 400 held-needle passes: no dropped stitch, no hole, no lost loop, every stitch cast off or secured at the end.
| Measurement | Should be | Simulated |
|---|---|---|
| Sock circumference (two layers) | 10.2–11.6 cm | ✓ 10.7 cm |
| Foot length, back of heel to toe tip | 7.5–9.5 cm | ✓ 8.5 cm |
| Leg height above the heel, with cuff | 6–8 cm | ✓ 7 cm |
| Heel and toe cups: needles left knitting in the middle | 25–45 % | ✓ 37.5 % |
| Rows to ease into each side seam | 0–3 rows | ✓ 2 rows |
The simulation checks the instructions and the arithmetic. Yarn, tension and blocking still differ from knitter to knitter, so knit the gauge swatch first and type in your own numbers. Knitted one? We would love a photo: support@purlbed.com.
Baby 0–6 months · Single bed, punch card · Gauge (stocking stitch, after steaming): 30 sts × 40 rows
Sizes
| Measurement | Baby 0–6 months | Baby 6–12 months |
|---|---|---|
| Foot circumference (round the ball of the foot) | 12 cm | 13 cm |
| Foot length | 9 cm | 11 cm |
| Leg above the heel | 5 cm | 6 cm |
| Cuff depth | 2 cm | 2 cm |
You will need
Yarn: Soft, washable sock yarn or superwash merino (4-ply / fingering) on a standard 4.5 mm machine. Avoid fluffy yarns: babies put their feet in their mouths.
About 15 g in total for this size (an estimate from the area of the pieces; buy a little more).
Also: Tapestry needle, Waste yarn (single bed), Hold levers or buttons set on the carriage
Gauge swatch first
- Cast on 40 needles with waste yarn and knit a few rows. Change to the main yarn and choose a tension that gives a fabric you like (see the starting points below).
- Knit 60 rows. Tie a contrast thread to the 11th needle from each side at row 10 and row 50, so the marks are 20 needles and 40 rows apart.
- Knit a few rows of waste yarn and take the swatch off. Steam or wash it the way you will treat the finished piece, and let it rest flat for a few hours.
- Measure between the marks: stitches in 10 cm = 20 ÷ width in cm × 10, rows in 10 cm = 40 ÷ height in cm × 10. Type the two numbers into the gauge boxes above; that tension is your main tension (MT).
Pieces
Sock (knit 2)
Cast on 16 sts, 143 rows. Flat size about 5.3 × 31.3 cm.
Row by row
- Bring 16 needles into work (L8 to R8). Cast on with waste yarn, knit about 10 rows, 1 row of ravel cord, then change to the main yarn. Set RC to 000.
- Turned hem: knit 8 rows at MT−1, 1 row at MT+2 (the fold line) and 8 rows at MT−1. Hang the loops of the first main-yarn row (just above the waste yarn) back on the needles, then knit 1 row at MT (RC 018). Remove the waste yarn later.
- Knit 20 rows at MT (RC 038).
- Short rows over all 16 needles (L8 to R8), to make the cup that curves round the heel or toe: for a while only the middle needles knit, the outer ones wait in hold. Set the carriage to hold. Before each row, push 1 needle on the side away from the carriage into hold, until 6 needles still knit in the middle (10 rows). Then, before each row, bring 1 held needle on the side away from the carriage back to work, until all 16 knit again (10 rows). Take the yarn under the end needle at each turn so no holes form. Release the hold (RC 058).
- The heel is done; now knit the sole. Knit 14 rows at MT (RC 072).
- Short rows over all 16 needles (L8 to R8), to make the cup that curves round the heel or toe: for a while only the middle needles knit, the outer ones wait in hold. Set the carriage to hold. Before each row, push 1 needle on the side away from the carriage into hold, until 6 needles still knit in the middle (10 rows). Then, before each row, bring 1 held needle on the side away from the carriage back to work, until all 16 knit again (10 rows). Take the yarn under the end needle at each turn so no holes form. Release the hold (RC 092).
- The toe is done; now knit the top of the foot back towards the cuff. Knit 14 rows at MT (RC 106).
- Knit 20 rows at MT (RC 126).
- Closing hem: knit 8 rows at MT−1, 1 row at MT+2 and 8 rows at MT−1 (RC 143), then a few rows of waste yarn, and release. Fold the hem inside along the loose row and sew the open loops to the first hem row.
Needle notation
Step 1 at the bottom; only the needles around the changes are shown.
Row sequence (47)
| Rows | What the carriage knits | Tension |
|---|---|---|
| 1–8 | Stocking stitch | MT−1 |
| 9 | Stocking stitch | MT+2 |
| 10–17 | Stocking stitch | MT−1 |
| 18–38 | Stocking stitch | MT |
| 39 | Stocking stitch · hold 1 | MT |
| 40 | Stocking stitch · hold 2 | MT |
| 41 | Stocking stitch · hold 3 | MT |
| 42 | Stocking stitch · hold 4 | MT |
| 43 | Stocking stitch · hold 5 | MT |
| 44 | Stocking stitch · hold 6 | MT |
| 45 | Stocking stitch · hold 7 | MT |
| 46 | Stocking stitch · hold 8 | MT |
| 47 | Stocking stitch · hold 9 | MT |
| 48 | Stocking stitch · hold 10 | MT |
| 49 | Stocking stitch · hold 9 | MT |
| 50 | Stocking stitch · hold 8 | MT |
| 51 | Stocking stitch · hold 7 | MT |
| 52 | Stocking stitch · hold 6 | MT |
| 53 | Stocking stitch · hold 5 | MT |
| 54 | Stocking stitch · hold 4 | MT |
| 55 | Stocking stitch · hold 3 | MT |
| 56 | Stocking stitch · hold 2 | MT |
| 57 | Stocking stitch · hold 1 | MT |
| 58–72 | Stocking stitch | MT |
| 73 | Stocking stitch · hold 1 | MT |
| 74 | Stocking stitch · hold 2 | MT |
| 75 | Stocking stitch · hold 3 | MT |
| 76 | Stocking stitch · hold 4 | MT |
| 77 | Stocking stitch · hold 5 | MT |
| 78 | Stocking stitch · hold 6 | MT |
| 79 | Stocking stitch · hold 7 | MT |
| 80 | Stocking stitch · hold 8 | MT |
| 81 | Stocking stitch · hold 9 | MT |
| 82 | Stocking stitch · hold 10 | MT |
| 83 | Stocking stitch · hold 9 | MT |
| 84 | Stocking stitch · hold 8 | MT |
| 85 | Stocking stitch · hold 7 | MT |
| 86 | Stocking stitch · hold 6 | MT |
| 87 | Stocking stitch · hold 5 | MT |
| 88 | Stocking stitch · hold 4 | MT |
| 89 | Stocking stitch · hold 3 | MT |
| 90 | Stocking stitch · hold 2 | MT |
| 91 | Stocking stitch · hold 1 | MT |
| 92–126 | Stocking stitch | MT |
| 127–134 | Stocking stitch | MT−1 |
| 135 | Stocking stitch | MT+2 |
| 136–143 | Stocking stitch | MT−1 |
Finishing
- Weave in the ends well on the inside and remove any waste yarn.
- Fold the sock in half at the toe (the middle of the second short-row cup), right sides out, so the cuffs meet.
- Sew both sides with mattress stitch from the toe to the cuffs, matching row for row. Keep the seams flat, so nothing rubs.
- Sew the ends of the cuffs together and steam lightly.
Notes and changes
- Measure the baby's foot if you can: babies grow fast and the sizes are only a guide. A sock a little long is fine; one too short is not.
- The leg height above the heel is a starting value. A longer leg can be folded down and stays on better.
What the words mean
- Short rows (引返)
- knitting only some of the needles for a few rows while the others wait. The middle grows taller than the sides, which makes a cup: that is how the heel and toe of a sock get their curve.
- Hold
- the needle position for short rows: a needle pushed all the way forward keeps its stitch and does not knit while the carriage is set to hold.
- Turned hem
- a neat double edge: knit a strip, then fold it up and hang its first row back on the needles, so the edge is a fold instead of a raw cast-on.
- 1×1 rib
- one stitch on the main bed, one on the ribber, side by side: the stretchy edge of socks, cuffs and hat brims. Needs a ribber or a double bed.
- Decrease / increase
- making the piece one stitch narrower or wider at the edge. Fully fashioned means moving the 2 edge stitches in (or out) with a transfer tool, so the edge stays smooth for sewing.
- Transfer tool
- the small hook (1, 2 or 3 prongs) that lifts stitches off needles and puts them on others.
- Waste yarn
- a few rows in a spare colour knitted before or after the piece and pulled out later, leaving open loops to hang back or sew.
- MT (main tension)
- the tension dial number of your gauge swatch. MT−1 is one number tighter, MT+2 two numbers looser.
- RC (row counter)
- the counter on the carriage. Set it to 000 after casting on; every step says what it should read when the step is done.
- L10 / R10
- needle numbers, counted outwards from the middle (0) of the needle bed.
- Mattress stitch
- the usual way to sew knitted pieces together: you catch the bar between the first two stitches on each side, so the seam disappears.
- Duplicate stitch
- embroidery that follows a knitted stitch's V shape with a needle and a second colour, so the pattern looks knitted in.
purlbed.com/templates/baby-socks/ · Virtual test knit passed
Suits these machines
- Single bed, punch card
- Single bed, electronic
- Single bed, no patterning
- Single bed (punch card) + ribber
- Single bed (electronic) + ribber
- Double bed with pushers (Passap type)
Techniques used
More templates
- Beanie
- Fold-up ribbed hat
- Slouchy hat
- Beret
- Earflap hat
- Baby bonnet
- Scarf
- Cowl
- Infinity scarf
- Triangle scarf
- Mittens
- Fingerless mitts
- Newborn scratch mittens
- Wrist warmers
- Arm warmers
- Socks
- Ankle socks
- Knee-high socks
- Christmas stocking
- Baby vest
- Leg warmers
- Boot cuffs
- Tote bag
- Drawstring bag
- Phone pouch
- Headband
- Cup cosy
- Baby blanket
- Doll sweater
- Teddy bear scarf and hat